

Ergonomic Home Office Setup for Back Pain
Editorial TeamLast Updated: October 22, 2026
Quick Summary
An ergonomic home office setup for back pain requires proper chair lumbar support, monitor positioning at eye level, correct desk and keyboard height, and foot support to maintain neutral posture. Small adjustments to alignment and regular movement breaks can reduce back pain without expensive equipment or a complete overhaul.
- Your office chair must have adjustable lumbar support positioned 1-2 inches above your hip bones to support your natural spine curve.
- Position your monitor at eye level, roughly 20-26 inches away, to prevent neck strain that radiates into your lower back.
- Keep your keyboard and mouse within 6 inches of your body at elbow height to avoid reaching and spinal rotation.
- Take a 2-3 minute movement break every hour with stretches like spinal twists and cat-cow poses to prevent stiffness.
- Start with free adjustments like repositioning your screen and keyboard before investing in equipment like lumbar pillows or ergonomic chairs.
Table of Contents
- Why Your Workspace Matters for Back Pain
- Step 1: Choose the Right Office Chair with Proper Lumbar Support
- Step 2: Set Monitor Height for Ergonomic Desk Setup
- Step 3: Position Your Desk, Keyboard, and Mouse
- Step 4: Add Foot Support and Maintain Neutral Posture
- Budget Ergonomic Home Office Setup Without Breaking the Bank
- Desk Stretches for Back Pain and Movement Breaks
- When to Seek Professional Help
- Frequently Asked Questions
Why Your Workspace Matters for Back Pain
Back pain from poor workspace setup is one of the most common complaints among remote workers. Your office chair, desk height, monitor position, and posture work together to either support or strain your spine.

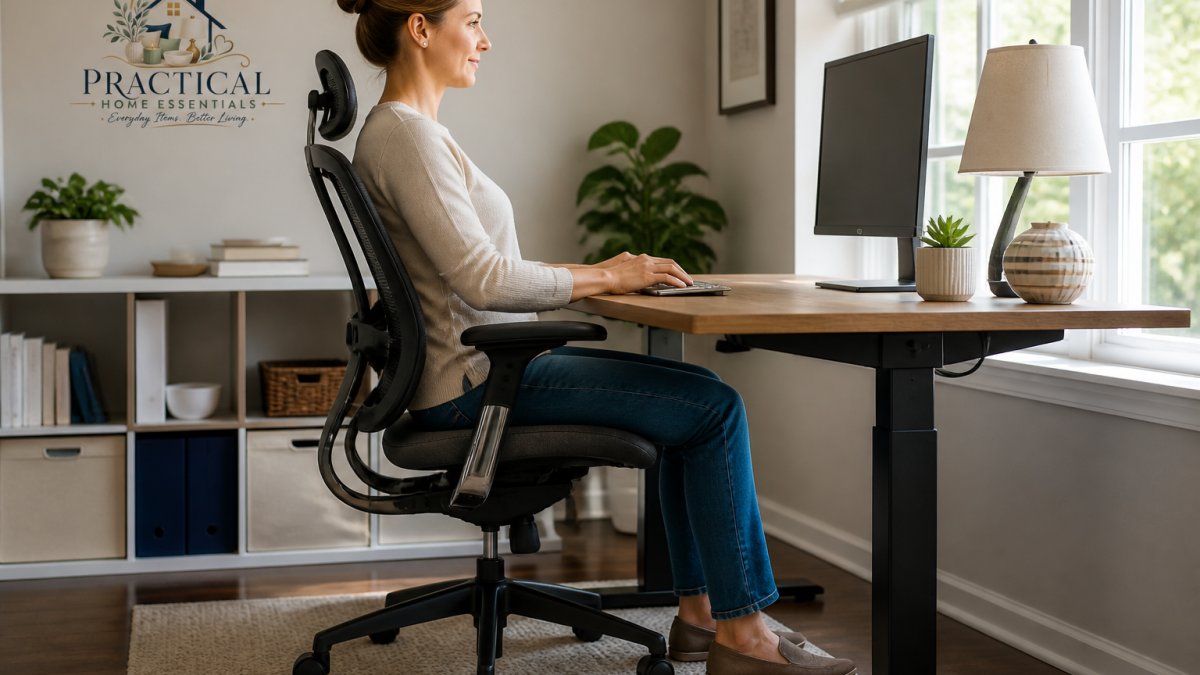
The key insight most people miss: back pain relief comes from alignment, not just comfort. A chair that feels soft might actually be working against you.
Step 1: Choose the Right Office Chair with Proper Lumbar Support
Your office chair is the foundation of an ergonomic home office setup for back pain. The right chair supports your lower back and keeps your spine aligned. The wrong chair puts constant pressure on your lumbar region, which leads to pain and fatigue.
What to Look for in an Ergonomic Chair
An ergonomic office chair should have these features:
- Adjustable lumbar support that moves up and down to match your lower back curve
- Adjustable seat height so your feet rest flat on the floor
- Adjustable armrests that support your upper arms without forcing your shoulders up
Look for a chair designed specifically for desk work, not a gaming chair or basic office chair. The lumbar region needs real support, not just padding.
Adjusting Your Chair for Maximum Support
Once you have an ergonomic chair, adjust it correctly:
- Set the seat height so your feet rest flat on the floor and your knees form a 90-degree angle
- Position the lumbar support so it fills the natural curve of your lower back (usually 1-2 inches above your hip bones)
- Adjust the armrests so your upper arms hang relaxed and your elbows stay at a 90-degree angle
- Recline the backrest slightly to a 100-110 degree angle to ease spine pressure
- Test the fit by sitting for 15 minutes and checking that your back feels supported, not strained
Many people skip this step and wonder why their chair doesn't help. Take 10 minutes to dial in your settings. It makes a measurable difference.
Our top pick for a solid ergonomic office chair is the Ergonomic Office Chair with Adjustable Armrests from PracticalHomeEssentials.com. It offers adjustable lumbar support, height control, and armrests that move to match your workspace. At $1,898.98, it's an investment, but a quality ergonomic chair pays for itself through reduced back pain and improved productivity.
Step 2: Set Monitor Height for Ergonomic Desk Setup
Monitor height is one of the most overlooked factors in an ergonomic home office setup for back pain. Place your screen too low and you'll hunch forward. Too high and you'll strain your neck, which pulls your entire spine out of alignment.
Your monitor should sit at eye level when you look straight ahead. This keeps your head balanced over your shoulders and reduces strain on your neck and upper back.
Finding Your Ideal Screen Distance and Angle
Follow these steps to position your monitor correctly:
- Sit in your chair with your back against the backrest and your feet flat on the floor
- Look straight ahead without tilting your head up or down
- Position your monitor so the top of the screen is at or slightly below eye level
- Set the distance at arm's length (roughly 20-26 inches from your eyes)
- Tilt the screen slightly upward (10-20 degrees) to reduce glare and keep your eyes on the upper portion of the screen
If you use a laptop, this is critical: a laptop screen is too low for proper viewing. Use a laptop stand to raise the screen to eye level, then add an external keyboard and mouse.
Many people work with monitors too close or too far. A simple adjustment here can eliminate neck strain that radiates into your lower back.
Step 3: Position Your Desk, Keyboard, and Mouse
Your desk height, keyboard position, and mouse placement work together to keep your arms, shoulders, and back in a neutral position. Get this wrong and you'll compensate with poor posture, which stresses your lower back.
Desk Height and Elbow Position
Your desk should be high enough that your elbows rest at a 90-degree angle when your arms hang naturally at your sides. This keeps your upper arms parallel to your spine and prevents shoulder hunching.
Here's how to check:
- Sit in your chair with your back against the backrest
- Let your arms hang naturally at your sides
- Your elbows should form a 90-degree angle
If your desk is too low, your shoulders rise and your back rounds forward. If it's too high, you'll reach upward and strain your shoulders. Even a 2-3 inch difference matters over a full workday.
Keyboard and Mouse Placement
Position your keyboard and mouse close to your body, directly in front of you:
- Place them at elbow height so your forearms stay parallel to the floor
- Keep them within 6 inches of your body to avoid reaching
- Position your mouse at the same height as your keyboard
Reaching for your mouse forces your shoulder forward and rotates your spine. This is a common cause of lower back strain that people don't immediately connect to their mouse position.
Step 4: Add Foot Support and Maintain Neutral Posture
Your feet anchor your posture. If they don't rest flat on the floor, your pelvis tilts and your lower back loses support.
Your feet should rest flat on the floor or a footrest, with your knees at a 90-degree angle.
If your feet dangle above the floor, use a footrest (even a sturdy box works in a pinch).
Ergonomic Office Chair with Adjustable Armrests →
Neutral posture means:
- Your head balanced over your shoulders
- Your shoulders relaxed, not hunched
- Your arms parallel to your spine
Check your posture every hour. Most people drift into forward hunching without noticing.
Budget Ergonomic Home Office Setup Without Breaking the Bank
You don't need to spend thousands to create an ergonomic workspace. Strategic low-cost adjustments can deliver real relief while you save for bigger upgrades.
Low-Cost Adjustments You Can Make Today
Start with these free or nearly-free fixes:
- Adjust your current chair using the steps above (if your chair has basic height and back adjustment)
- Use books or a monitor stand to raise your screen to eye level
- Roll up a towel to create a lumbar support pillow behind your lower back
These adjustments cost nothing and often provide noticeable relief within a few days.
When to Invest in Key Equipment
After you've made free adjustments and identified what helps most, invest in these items:
- Lumbar support pillow ($25-50): Adds support to any chair while you save for an upgrade
- Monitor stand or laptop stand ($30-80): Raises your screen to eye level without buying a new desk
- Ergonomic keyboard and mouse ($40-100): Reduces strain on your wrists and shoulders
Start with the low-cost fixes. Then add one piece of equipment at a time based on what your body needs most.
Desk Stretches for Back Pain and Movement Breaks
Sitting, even in a perfect ergonomic position, is still sitting. Your body needs movement to maintain circulation and prevent stiffness. Regular stretches and position changes are as important as your chair setup.
Simple Stretches to Do Every Hour
Take a 2-3 minute break every hour to do these stretches:
Seated spinal twist:
- Sit upright in your chair
- Cross your right leg over your left
- Gently twist your torso to the right
Cat-cow stretch:
- Sit upright with your hands on your thighs
- Arch your back and look slightly upward (cow)
- Then round your spine and tuck your chin (cat)
Seated forward fold:
- Sit upright with your feet flat on the floor
- Slowly bend forward from your hips, letting your arms hang
- Hold for 20-30 seconds (don't force the stretch)
Shoulder rolls:
- Roll your shoulders backward 10 times
- Then roll them forward 10 times
- This releases tension in your upper back and shoulders
Neck stretches:
- Tilt your head gently to the right, holding for 15 seconds
- Repeat on the left side
- Then slowly look down, tucking your chin slightly, and hold for 15 seconds
These stretches take 3 minutes total and prevent the stiffness that builds during long work sessions.
Building a Realistic Daily Routine
You don't need a complex stretching routine. Consistency beats intensity. Here's a realistic schedule:
- Every hour: Take a 2-3 minute movement break (stretch or walk)
- Every 2-3 hours: Stand and walk for 5 minutes
- Lunch break: Walk outside for 10-15 minutes
The movement break is more important than the specific stretches. Your body needs position changes and circulation boosts throughout the day.
When to Seek Professional Help
An ergonomic home office setup for back pain helps most people, but it's not a substitute for professional care. If you experience any of these, see a healthcare provider:
- Back pain that worsens despite ergonomic adjustments
- Pain that radiates down your leg or into your foot
- Numbness or tingling in your legs or feet
Your workspace setup supports your back, but underlying issues like muscle strain, disc problems, or nerve compression need professional evaluation.
A physical therapist can assess your specific situation and recommend targeted exercises or adjustments beyond general ergonomic principles.
Back pain from your workspace is preventable. Start by adjusting your current setup using the steps above. These changes cost little or nothing and often deliver quick relief.
Frequently Asked Questions
How should I set up my home office to reduce back pain?
Start with an ergonomic office chair that supports your natural spinal curve, position your monitor at eye level about 20-26 inches away, and keep your desk height so your elbows form a 90-degree angle when typing. Your feet should rest flat on the floor or a footrest, and your keyboard and mouse should be close to your body to avoid reaching. Make these adjustments gradually and take movement breaks every hour to reduce spine pressure and improve circulation.
What is the best sitting posture for back pain at a desk?
Neutral posture means your shoulders are relaxed, your back maintains its natural spinal curve against the backrest, your elbows stay parallel to your spine at 90 degrees, and your hips are slightly higher than your knees. Your head should align with your shoulders, not jutting forward toward the screen. Avoid slouching or leaning back too far, as both increase pressure on your lower back. Adjust your chair's lumbar support to match the curve of your lumbar region for maximum relief.
Can I set up an ergonomic home office on a budget?
Yes. Start with no-cost adjustments: use a pillow or rolled towel behind your lower back, stack books or a laptop stand to raise your monitor to eye level, and place your keyboard and mouse on your work surface at the right height. A basic footrest costs $20-40, and an adjustable chair with lumbar support like the Ergonomic Office Chair with Adjustable Armrests ($1,898.98) is an investment that pays off if you spend hours daily at your desk. Prioritize the chair first, then monitor height, as these have the biggest impact on back pain relief.
How often should I take breaks from sitting at my desk?
Stand and stretch every 60 minutes to reduce prolonged sitting strain. Even 2-3 minutes of movement helps improve circulation and relieve spine pressure. Use these breaks for simple desk stretches like shoulder rolls, spinal twists, or forward bends. If you experience back pain during work, take a break sooner. Consider alternating between sitting and standing if you have access to a sit-stand workstation, which allows you to change position throughout the day without leaving your workspace.